Patient:
Dentate or Partially Edentulous
Prior to surgery familiarize yourself with the surgical report. Keep your drill sequence reports nearby or place them on a wall for easy visual access.
Have your assistant prepare the items below and disinfect all your guides prior to surgery. Be careful not to mix-up the MU/SRA abutments and components as each part is designed for each implant site.
The report provides you with a drill sequence, but it is up to you if you should deviate from the manufacturer proposed drill sequence based on the patient’s bone quality.
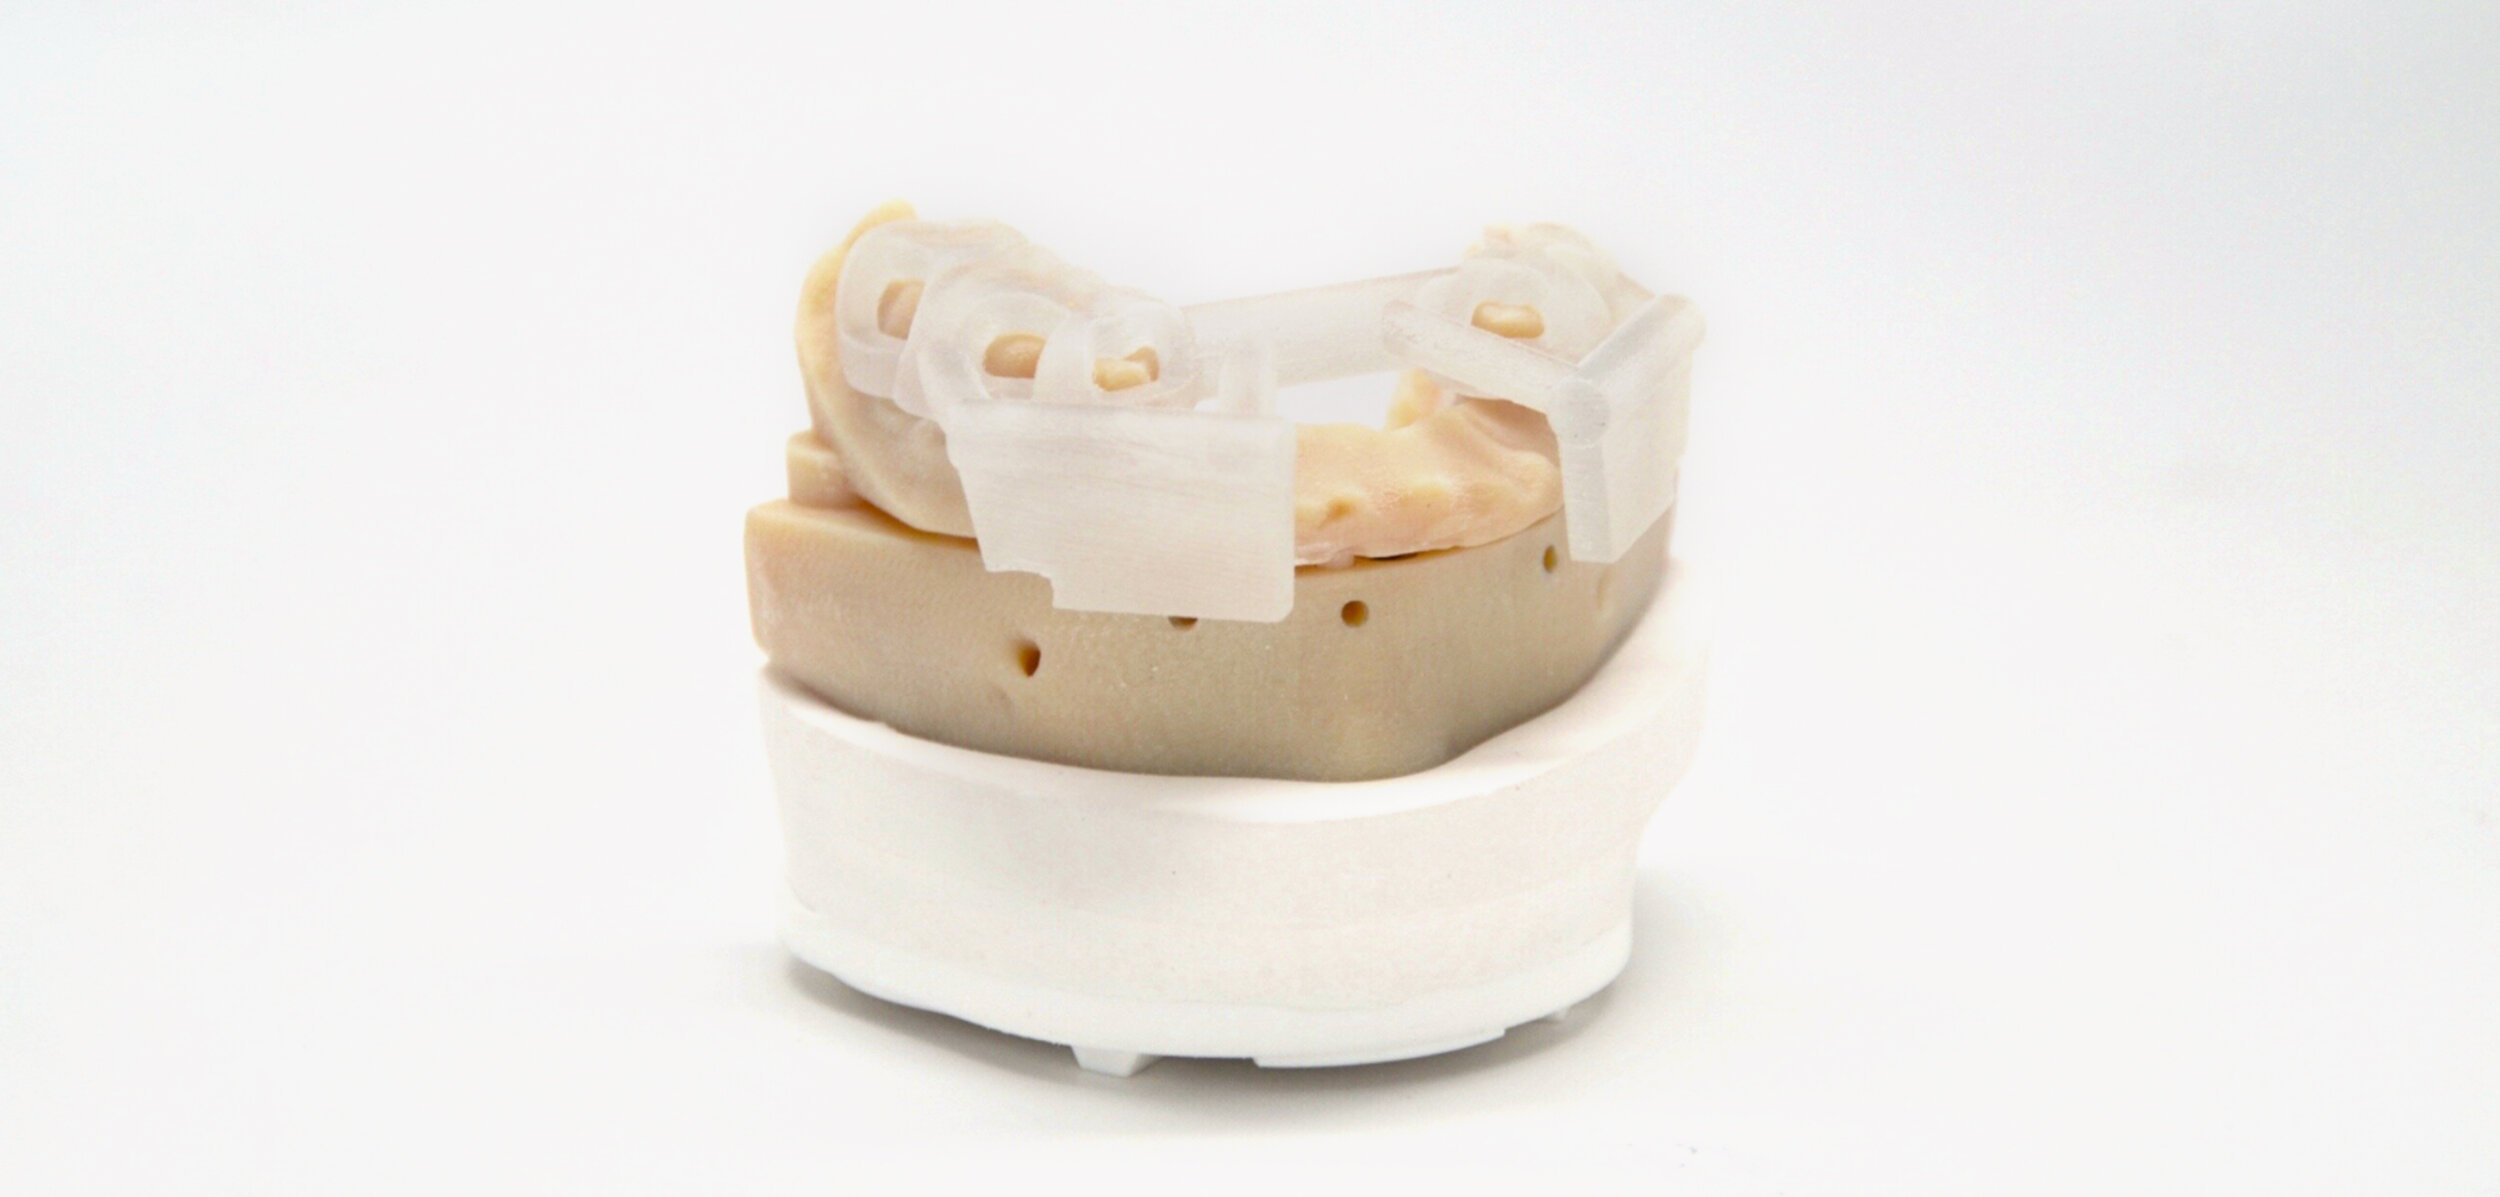
Anatomical Model
Incisal Guide
Tooth Alignment Guide
Unilateral Key Fixation (UKF)
Bone Reduction Guide
Osteotomy Guide
MU/SRA Abutments and Holders
Temporary Cylinders and Prosthetic Screws
Block-Out Plugs
Fixation Pins and/or Bone Screws
2.0 X 24mm Pilot Drill
PMMA Screw Retained Temporary
VOS Appliance
Surgical Report
Back-up denture upon request (extra fee applies)
Incision Guide
The Incision guide is only to be used when the vertical incision technique is chosen.
The incision guide is used to help the surgeon place incisions as accurately as possible prior to reflecting the tissue. (For more information call Allure Dental Studio)
Pre-Op
Incision and Reflection
Aggressive flats are not necessary with our protocol.

Pre-Extraction Before Fixation
Each approved case will be provided with a patient specific case report. There may be special instructions to indicate pre-extraction(s) of certain teeth before the incision guide or tooth aligner can be inserted. Typically, this is due to crowded or misaligned teeth or roots located where fixation may need to be placed.
Pre-Extraction

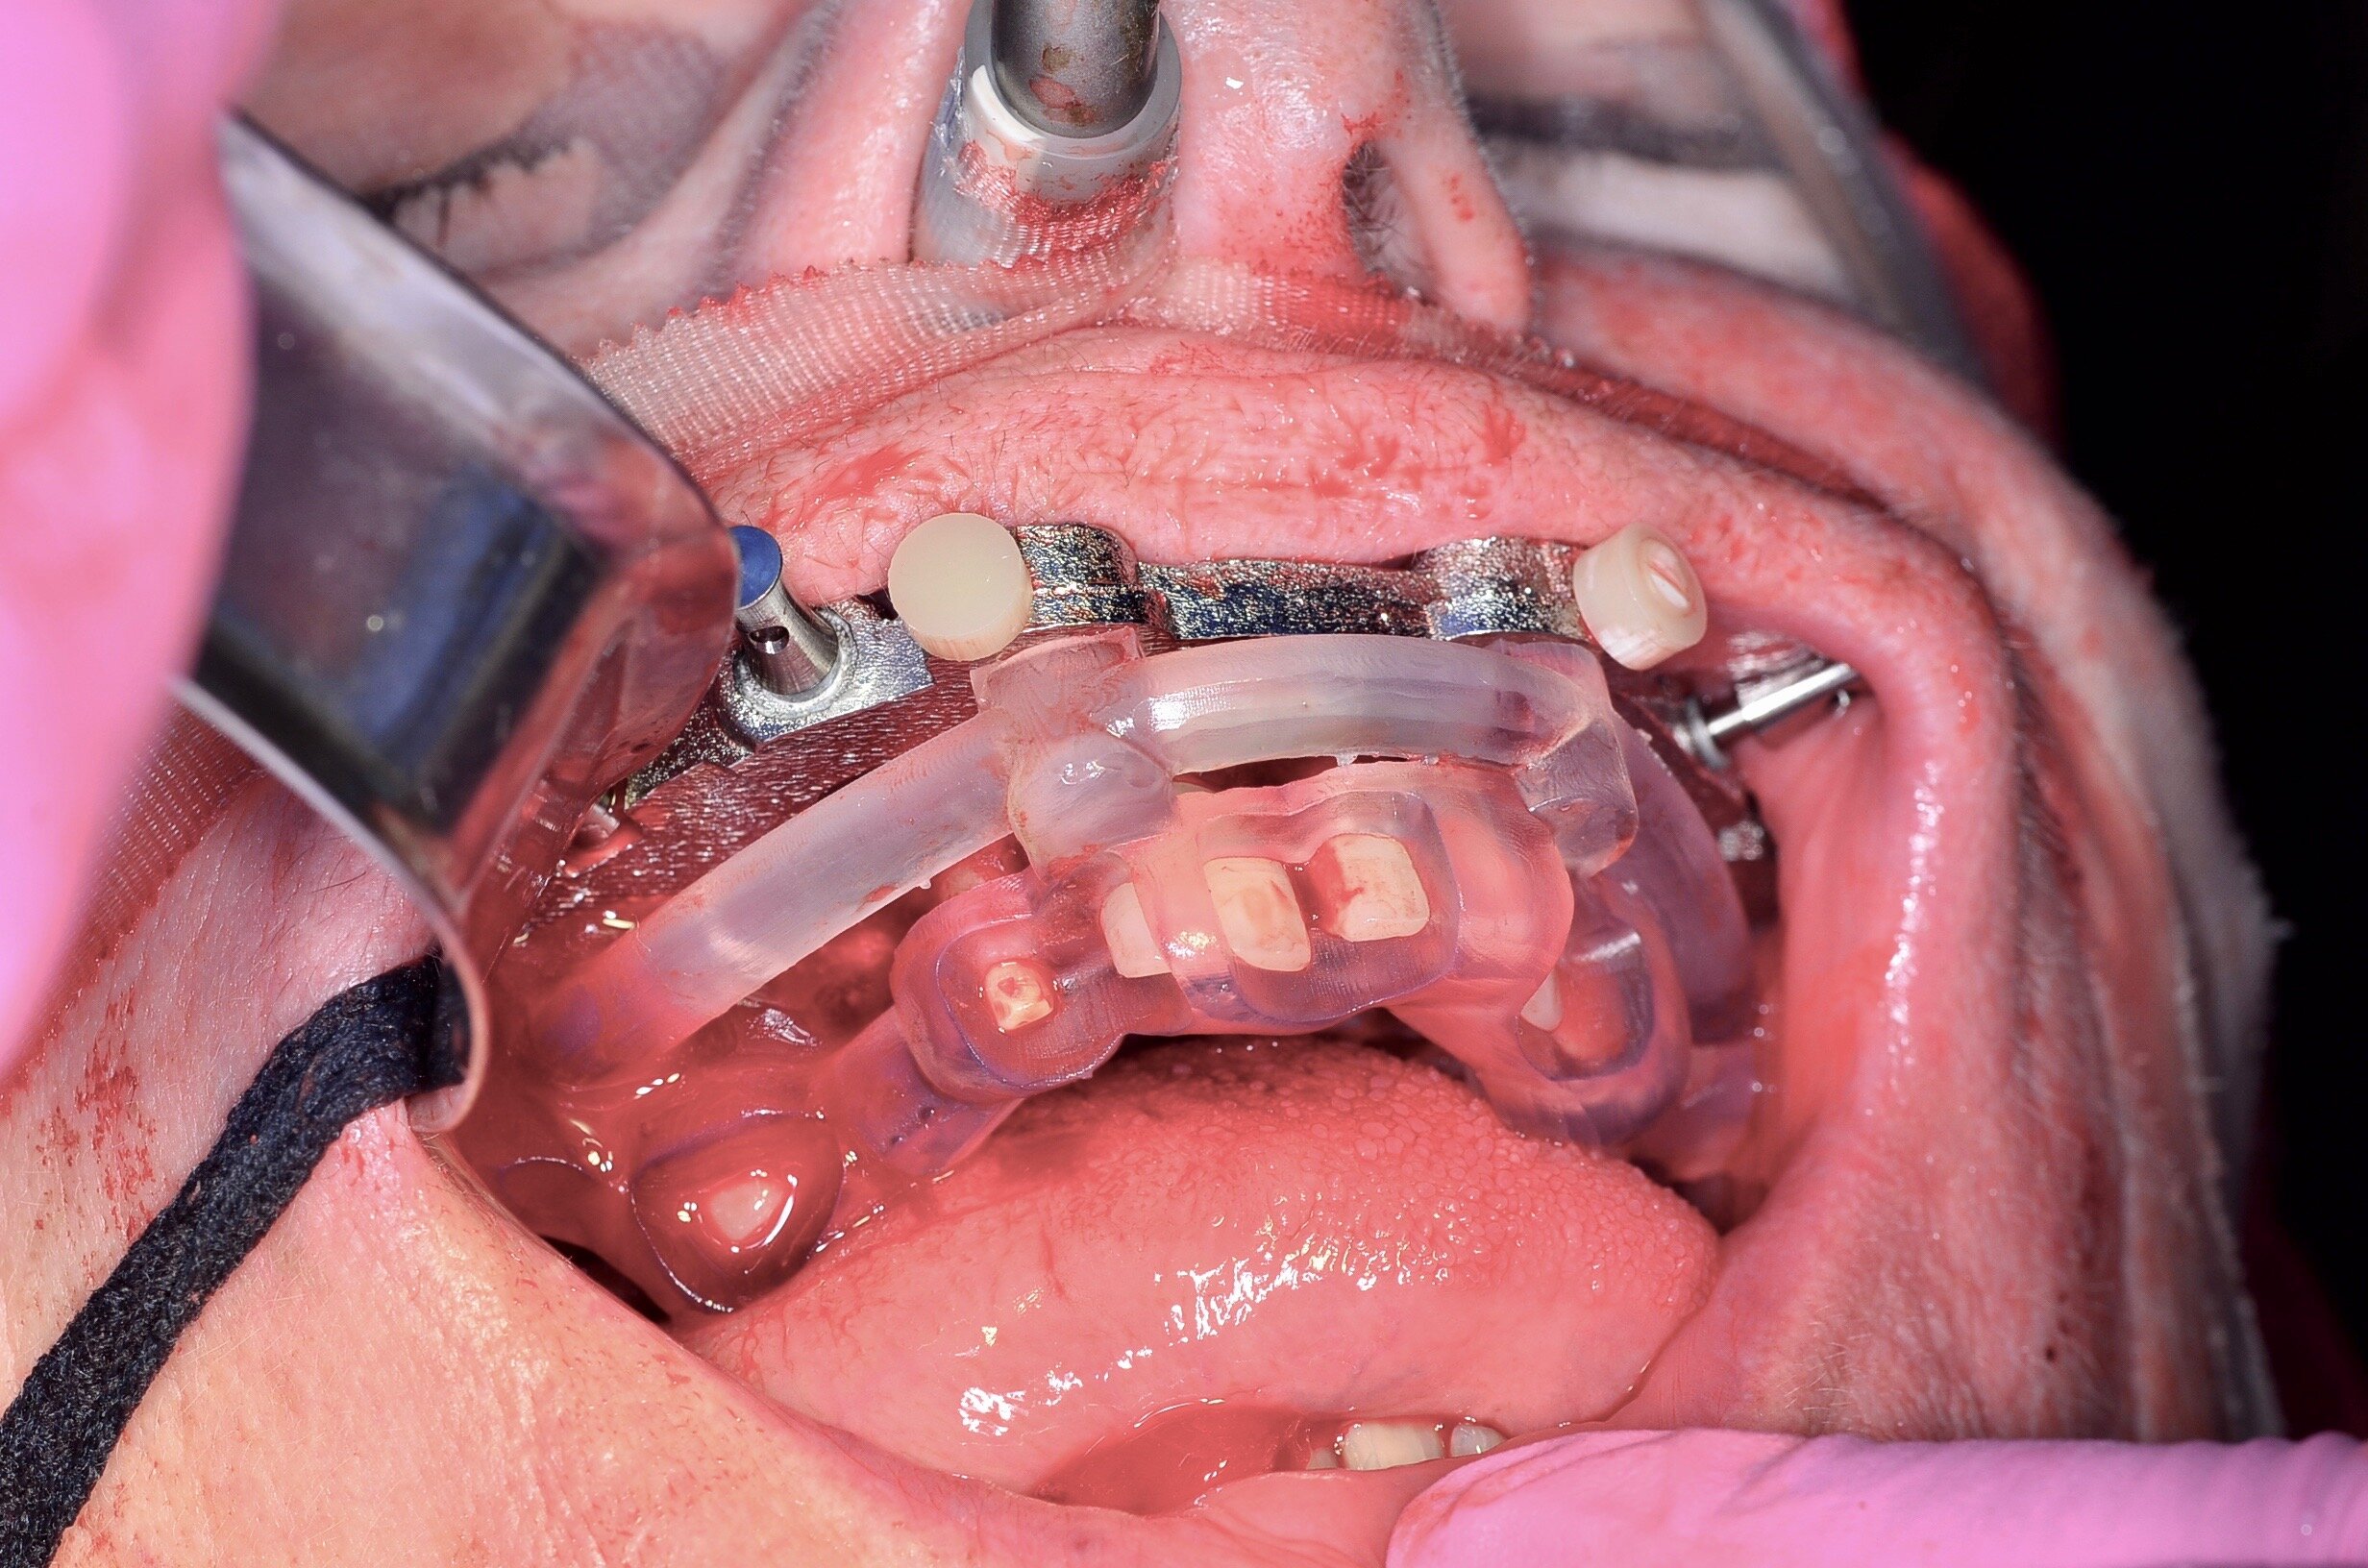
UKF Seating Sequence
Allure Dental Studio guided protocols combined with the fixation base serves as a fixed point in orientation from the patient’s pre-operative centric occlusion and the new pre-planned occlusion. The key to the entire procedure is the accurate seating of the Unilateral Key Fixation (UKF) base frame.
Special attention is made to the refinement of the tissue reflection. The clinician will use visual and tactile senses to place the guide against the buccal bone.
We offer two types of UKF printed out of different materials The default UKF is printed out of the latest nylon materials. For an extra charge of $225 you can order one in Chrome Cobalt.
UKF Base Frame & Tooth Aligner

Familiarize yourself by trial-fitting the base guide onto the model to see and feel proper fitting. We cannot over emphasize the importance of this step.

Verify that the Tooth Aligner is seated properly by observing the position of the guide against the teeth through the viewing windows. The teeth should be flushed against the guide.
If it does not fit perfectly, look for obstructions such as flapped tissue in the buccal and more likely lingual area.

Once it has been determined that Tooth Aligner is fitting accurately, the UKF base guide is held in place and the Tooth Aligner is inserted into the UKF base guide.
Notice how the UKF seats flush with the Tooth Aligner Guide.
Once again make sure that the Tooth Aligner is flushed against the guide by observing the position of the guide against the teeth through the viewing windows. This step is EXTREMELY important if you want to maintain an accurate occlusion.
Drilling And Fixation Pins

After confirming the fit of both guides, use the latch pins to secure the Tooth Aligner to the UKF.
The UKF base guide is now locked against the buccal bone.
Insert the pilot drill in the UKF until the tip seats against the bone. Start drilling ONLY when the drill is against the bone.
You will feel resistance when inserting the drill in the UKF sleeve. DO NOT start the drill before it is fully inserted in the sleeve and resting against the bone. You could seriously damage the UKF if you were to start the drill outside of the sleeve and force your way in.
Once the pilot holes are drilled, insert the fixation pins to secure the UKF against the bone.
Bone screws can also be used in combination with fixation pins. A minimum of two bi-cortical pins are needed.
Seated Into The undercut

Now that the fixation pins are placed, remove the latched aligner by removing the pins from the UKF.
Observe the precision fit of the UKF against the bone.
Extraction and Bone Reduction
Due to the precision of the Bone Reduction Guide you can expedite the bone reduction utilizing a Pikos block contouring bur.
We offer two types of Bone Reduction Guides, both printed out of different materials The default guide is printed out of the latest carbon, polymer or nylon materials. For an extra charge of $225 you can order a Chrome Cobalt guide.
In certain occasions, the UKF can be utilized as a bone reduction guide without adding extra part to it. In this instance you will not be charged for a Bone Reduction Guide.
UKF Seated
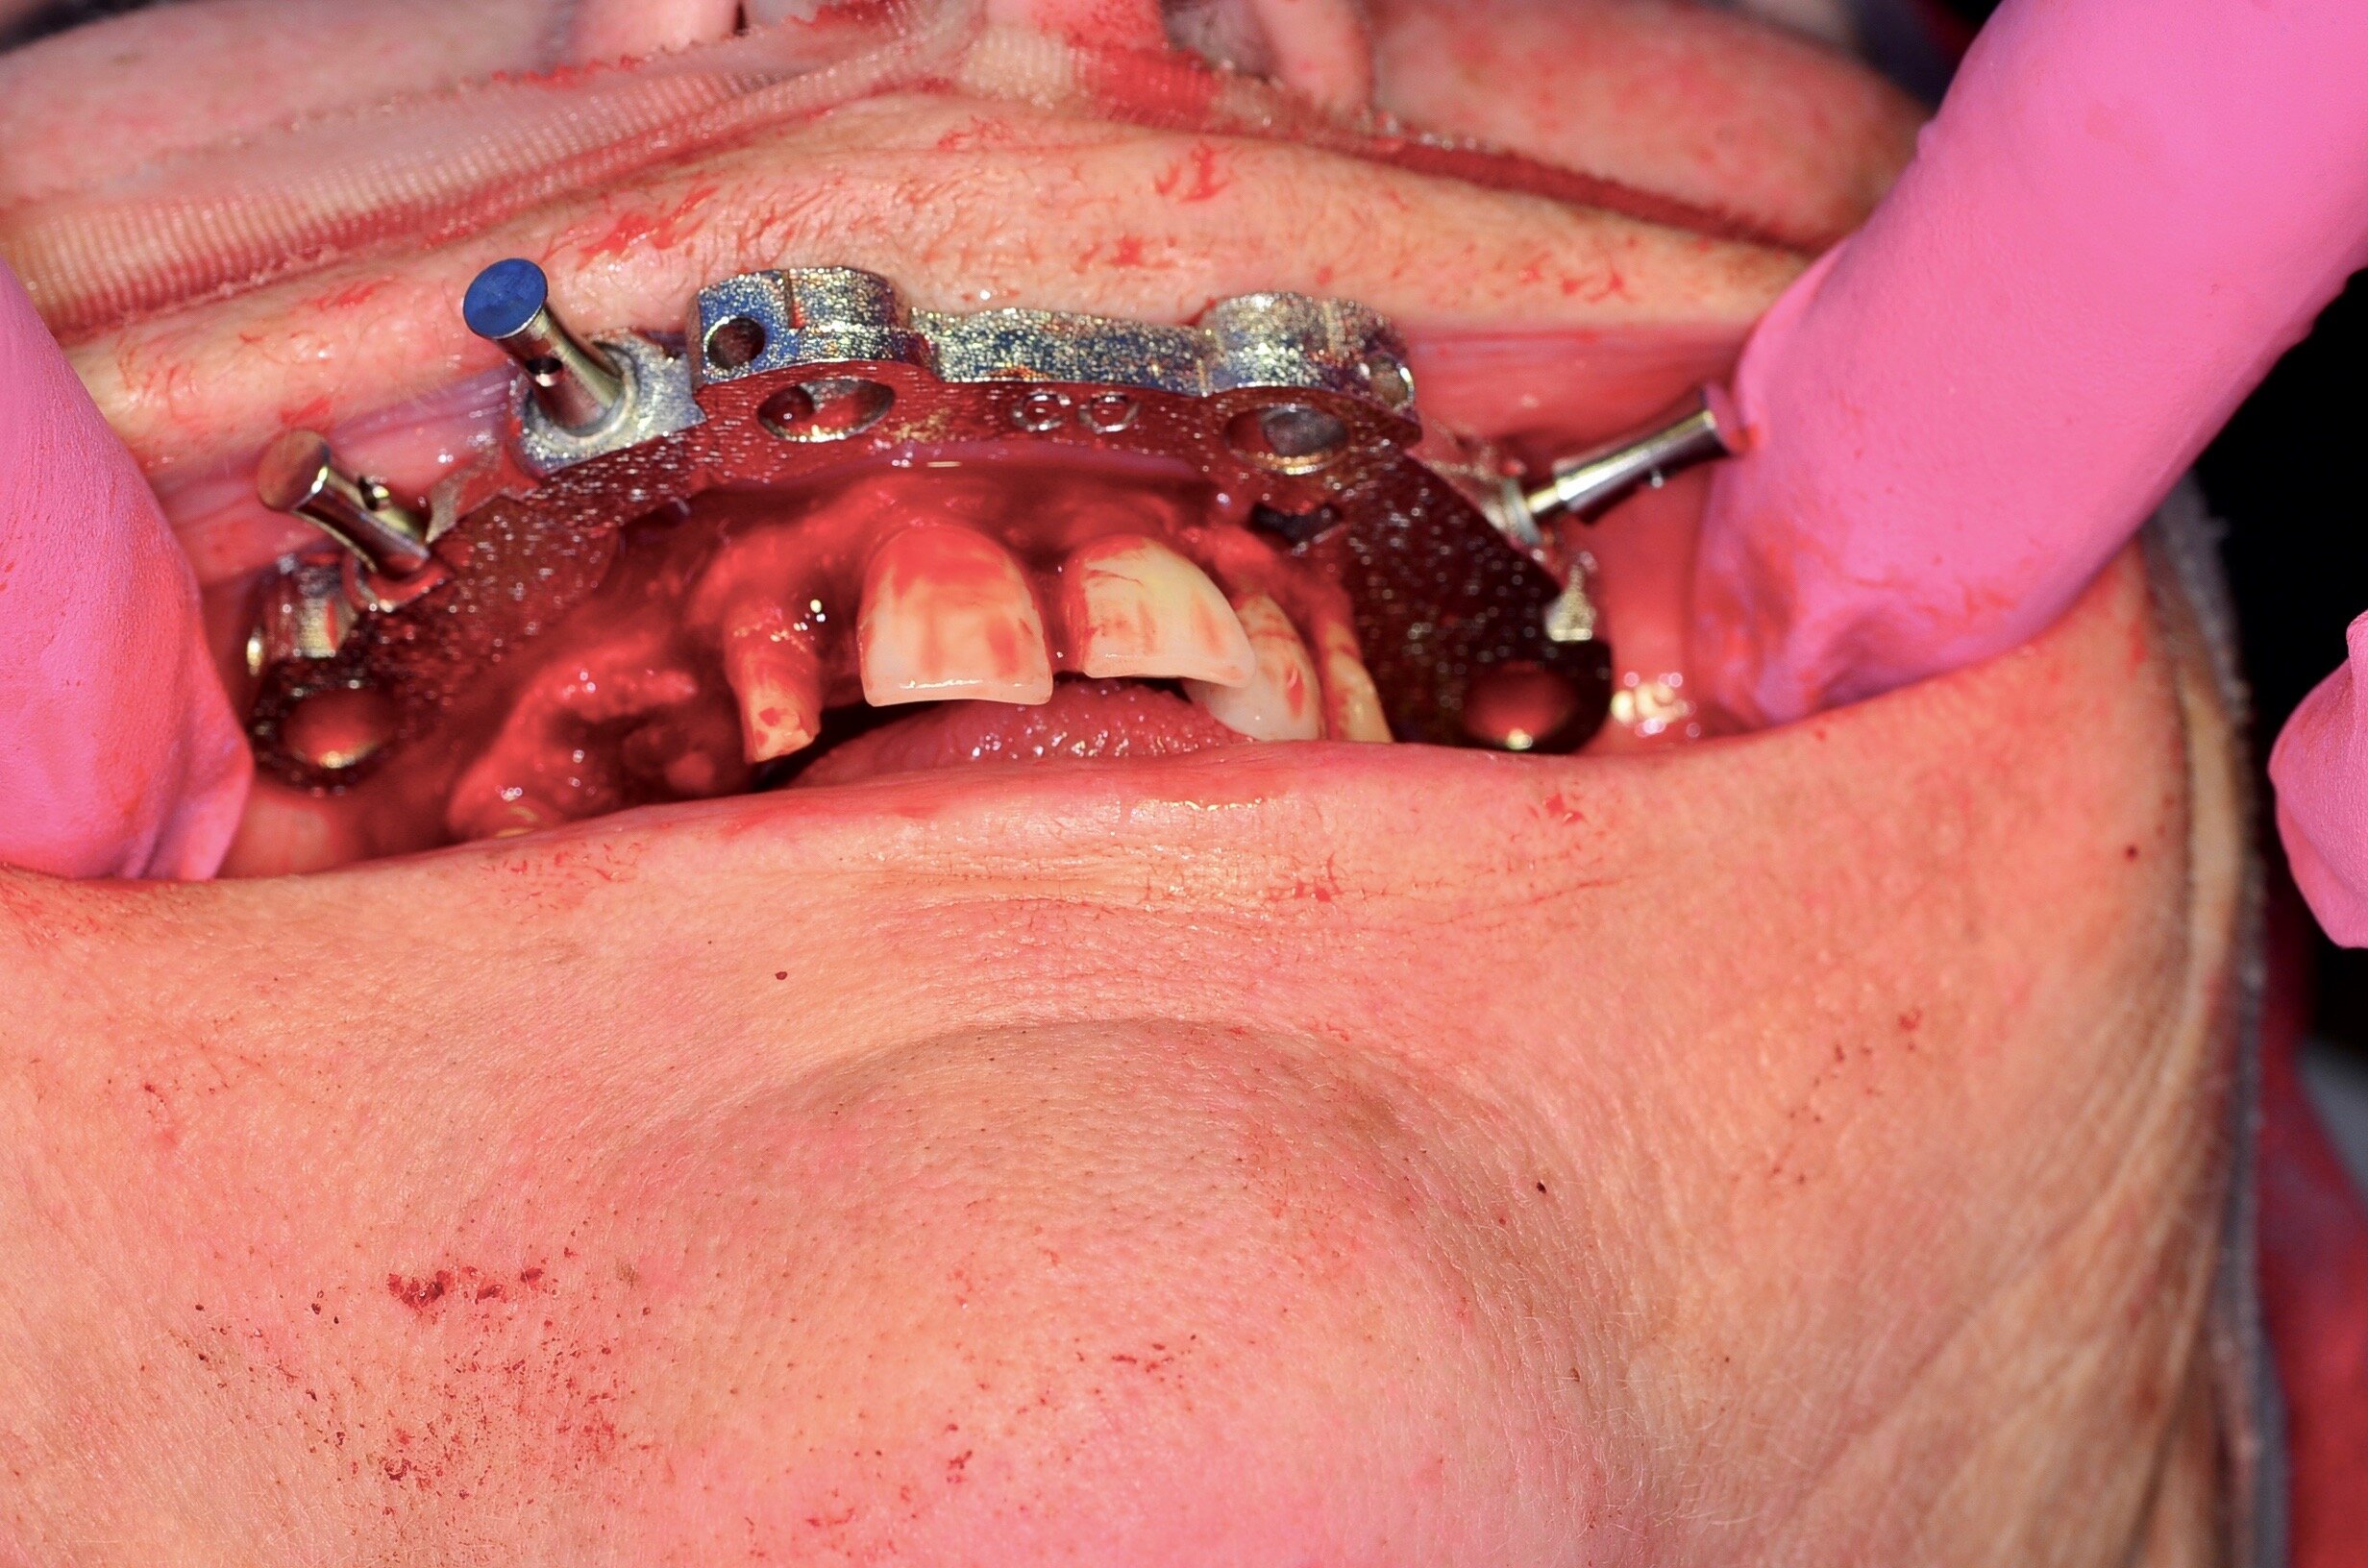
Verify the fit of the UKF against the buccal bone.
Extraction

Extract all the remaining teeth.
Make sure not to blow any buccal plate in the area of future implant sites.
Bone Reduction Guide

Reflect the lingual tissue and reduce the bone to the guide level.
Some cases may have a separate bone reduction guide, however the UKF may also be used as the bone reduction guide. It varies by case and will be communicated to you on the surgical report.
Reduce the bone flush to the bone reduction guide.
The edges of the buccal and lingual bone will require refinement once the UKF guide is removed and prior to suturing.
Bone Reduction Check
Our Verification jig, Occlusion jig and Soft tissue jig AKA (VOS Appliance) is utilized to do a quick verification of occlusion and bone reduction.
Bone & Bite Check

After the bone reduction has been completed, the VOS appliance or better yet, the temporary can be inserted and latched securely into the UKF guide. If the VOS appliance or temporary can not be latched passively, visually inspect for bone or tissue interference.
If it has been determined the interference is bone related remove the appliance from the UKF and reduce the infringing bone. if the interference is tissue related, further tissue reflection will be required.
Once the VOS appliance or temporary is securely latched, the occlusion can be checked and verified before starting the next guide.
Osteotomy Guide & Procedure
After the bone reduction has been completed, checked and refined.
Use the provided case report to guide you through the guided drill sequence as determined by the approved implant plan.
Verify that all the bases of the Osteotomy Guide are flush against the UKF platform and securely latched. Do not force anything as the fit must be passive.
Once the osteotomy drill sequence has been completed, the implants are ready to be placed through the guide.
Drill Guide Latched
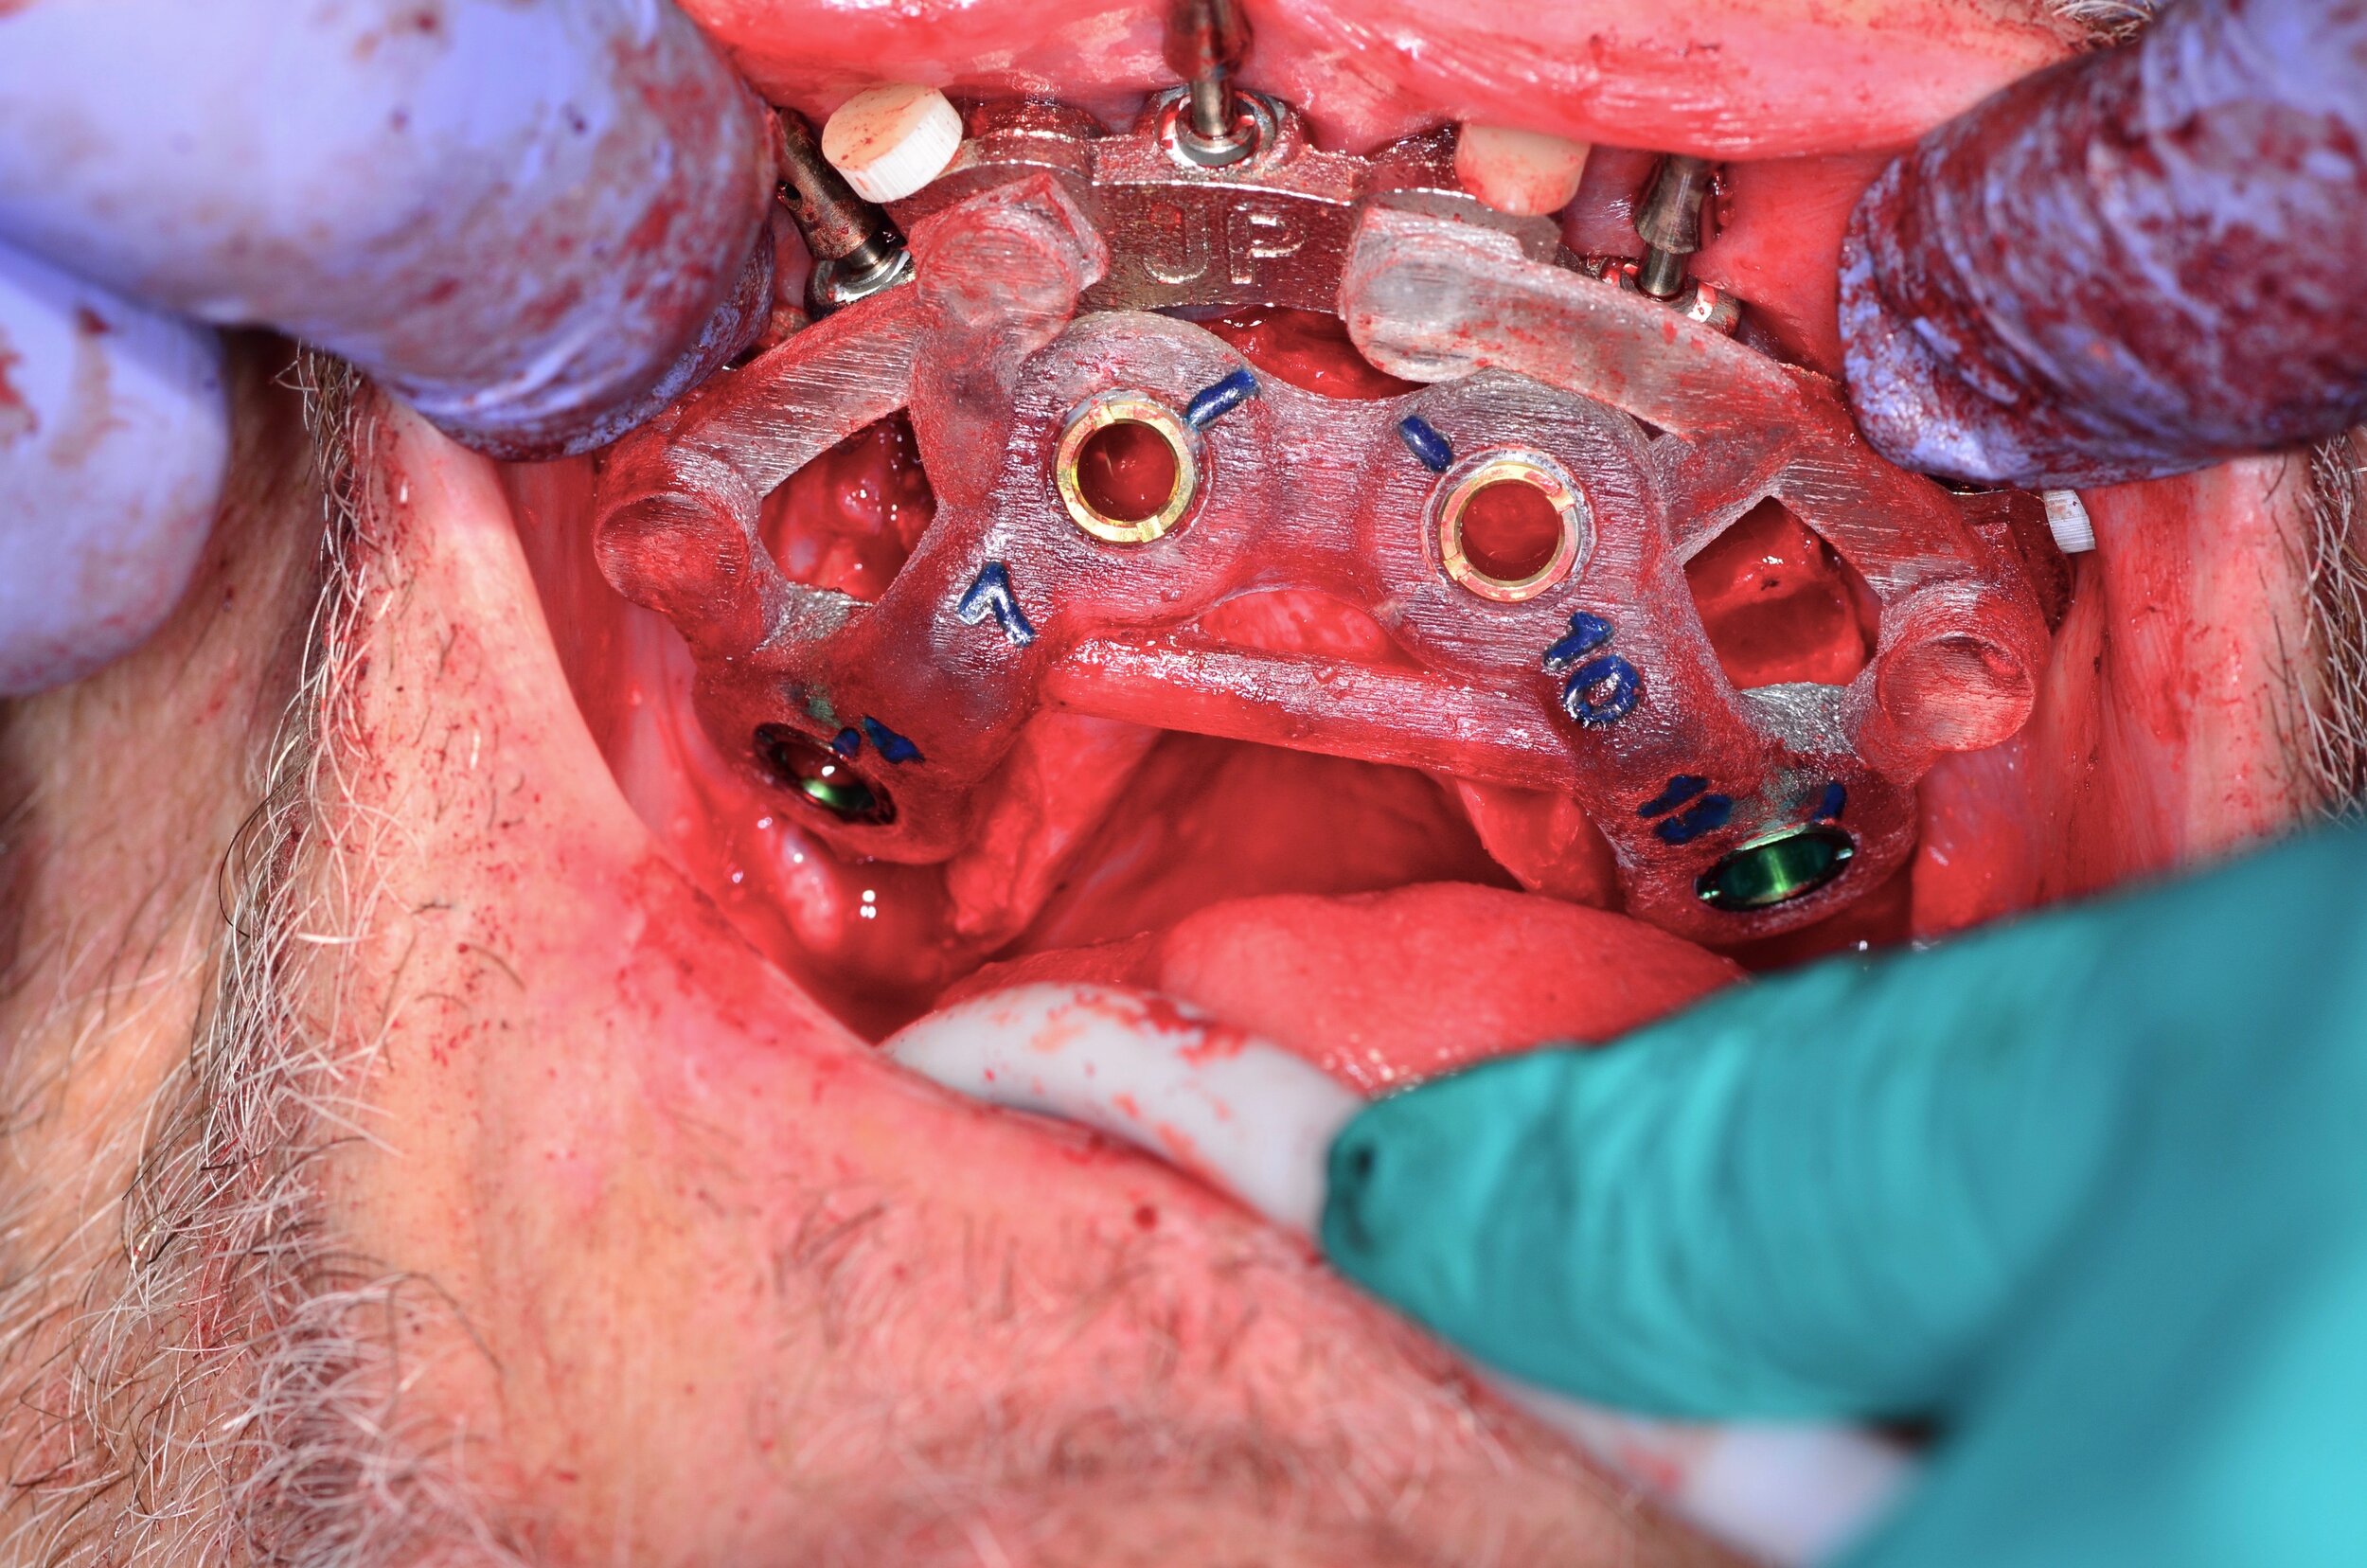
Our Osteotomy Guide is now latched securely in the UKF. Verify that all the bases of the Osteotomy Guide are flush against the UKF platform. Do not force anything, it must fit passively. If it is not, visually look for any obstructions such as soft tissue or bone particles in the UKF.
Be patient as good enough does not work with this process. It must be perfect.
Place Through The Guide

The surgical report provides you with a drill sequence, but it is imperative that you use your skills and knowledge to determine if you should deviate from the manufacturer proposed drill sequence based on the patient’s bone density.
Guided To Depth & Rotation

Blue timing marks are indicated on the guide to line-up with the correct rotation of the implant. Make sure that the line/bubble on the implant mount or driver lines-up perfectly with our blue mark. Deviating from it is not an option!
Abutment Guide & Placement
When all the implants have been successfully placed and timed, remove the latch pins and osteotomy/implant guide from the UKF.
Angled MU/SRA abutments may require that you profile the bone prior to positioning them onto the implant. By not doing this step, the distal bone may interfere with the abutment.
The Abutments are provided to you along with the abutment holder and numbered per implant site.
When handling the abutments do not mix them up, it will create serious precision issues.
Abutment Aligner

To facilitate the correct positioning of angulated multi-unit/SRA abutments, alignment lines are identified for correct orientation.
Insert and latch the abutment alignment guide into the UKF base guide. Verify that all the bases of the abutment guide are flush against the UKF platform. Do not force anything as the fit must be passive.
Abutments Torqued

The correct rotation of the MU/SRA abutment is carried out by aligning the screw driver access position with the line marked on the guide. Straight abutments do not require timing lines.
When properly placed, the line aligns with the screw head on angulated MU/SRA abutments. The correct rotation of the multi-unit abutment has now been established.
Do not fully torque an abutment if the torque value of the abutment is greater/equal to the torque value of the implant. For more information call one of our specialists.
If you are having difficulties seating the MU/SRA abutments check for interfering bone that might be in the way. A good way to avoid this problem is to profile the bone around the implants prior to seating the MU/SRA abutments. You may want to introduce this technique to your protocol. For more information call Allure Dental Studio and ask to talk to one of our implant specialists.
Last Section:
Next Section: